Explorer is a tool used throughout Control to assist you in locating companies, orders, estimates, activities, and a variety of other information you may need while using Control. You may access Explorer from the Home screen, action toolbar, or by selecting the magnifying glass icon found in multiple places in the program.
Main Screen
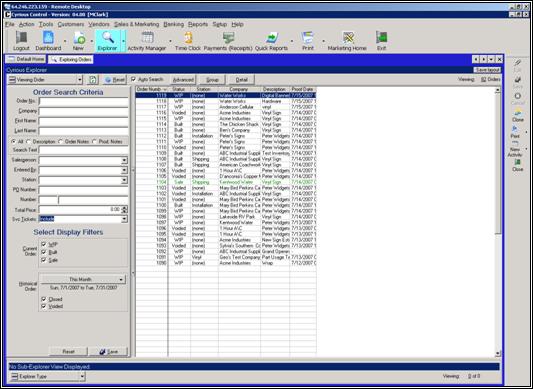
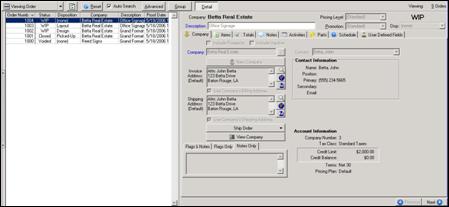
The Explorer main screen is made up of four areas.
Toolbar Select different views and options.

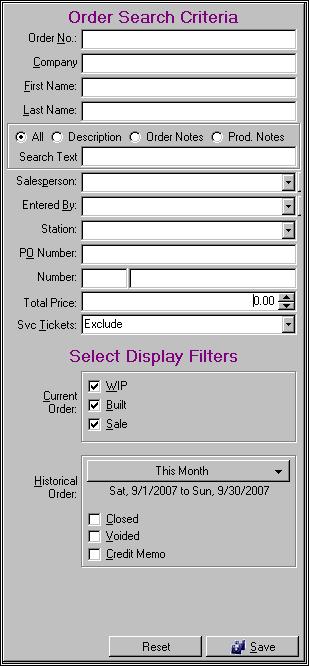
Order Search Criteria Specify exactly what you are searching for. Explorer uses numerous criteria to filter search results.
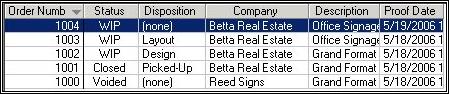
Results Window Display the search results.
Sub Explorer Screen Display a set of records associated with the search results.


The Sub Explorer screen is covered in more detail in the following section.
Viewing Options
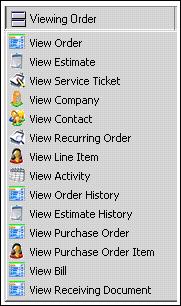
Use the drop-down menu on the left-hand side of the screen to select the type of record you are searching for.
- Viewing Drop-down list for selecting other items to view.
 |  |
*  RefreshClick this button if your screen does not display results immediately after you hit the Search button.
*  ResetClick this button to clear all entry fields and results.
*  Auto-SearchContinuously updates your search as you enter new information into the fields, without having to press Enter.
||  || This option will slow your system down if you are retrieving a large number of results. ||
 AdvancedSelecting this button toggles between the simple and advanced modes of searching.
|||| Alternating between modes will delete the results of the current search. || GroupGroups your results by the criteria across the top of the screen. When selected a tick appears in all checkboxes to the right of the results window. When the Group button is selected, additional buttons also become available. This allows for individual lines to be unselected. Use these groups to organize information to print or to use in macros.
>


|| || Use these groups to organize information to print or to use in macros. ||
 Select AllClick to Select all search result items.
* Unselect AllClick to Unselect all search result items.
* DetailClick to reveal the detail of the highlighted selection. Located at the top right of the Explorer screen, this option allows you to save the current screen layout. Located at the top-right corner of the Explorer screen, these buttons provide quick access to the Previous Home screen, Next Home screen, Drop-down menu showing all open screens and Close Current screen.
Special Actions Menu Commands
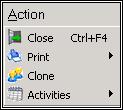
Close Closes the Explorer window.
Print A sub menu provides a variety of print options.
Clone Clones the selected record in the Explorer window.
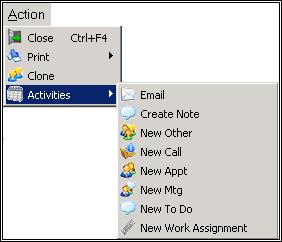
Activities A sub menu provides a list of Activity options.
View Order
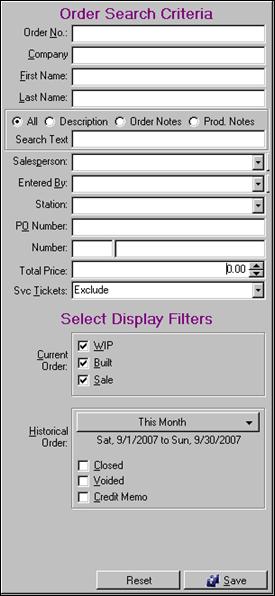
Order No. Enter a specific order number. If you do not know it, you can click on the magnifying glass to search for the order in Explorer.
Company Enter a company name to search for; you can use a wildcard (*) if you don't know the exact company name.
Names Searching for a name will search all names associated with an order, not just the primary contact.
Search Text Search descriptions of all line items.
Choosing a Salesperson or Enterer Use the ellipsis box to the right of Salesperson and Entered By to reveal an organizational structure containing employees.
Station Select an order station to filter on.
P.O. Number Enter a specific Purchase Order Number.
Numbers Searching numbers will search all forms of telephone contacts (office, cellular, etc.).
Divisions You must enable divisions before you can search for them.
Total Price Search by entering the total price of the order.
Service Tickets You may choose to include service tickets in a search.
Display Filters Use the filters to narrow your search. Using the Historical Orders filter will search both temporal records and those sorted by closeout dates. Click on This Month to reveal a selection of filters from which to choose. You can also search closed and voided orders.
Current Orders Select to view works in progress (WIP), Built, or Sale orders.
Historical Orders Click on this button to select a date range for your search.
Reset/Save The options selected for your Search can be saved as the default or, they can be reset to the original default.
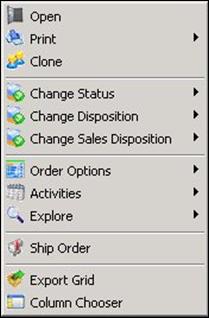
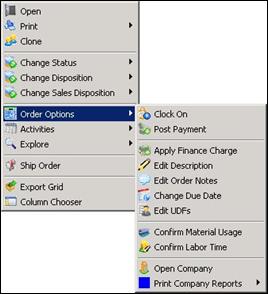
Right Click Options
|| ||
||  ||
||  || View Estimate
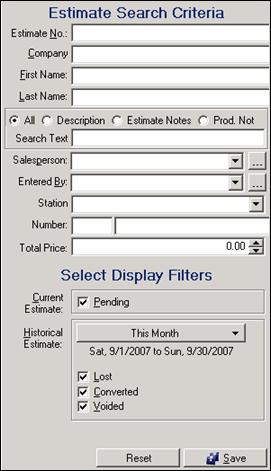
Estimate No. Enter a specific estimate number. If you do not know it, you can click on the magnifying glass to search for the estimate in Explorer.
Company Enter a company name to search for; you can use a wildcard (*) if you don't know the exact company name.
Names Searching for a name will search all names associated with an estimate, not just the primary contact.
Search Text Search descriptions of all line items.
Choosing a Salesperson or Enterer Use the ellipsis box to the right of Salesperson and Entered By to reveal an organizational structure containing employees.
Station Search according to the estimate station.
Number Search by company/contact phone number.
Total Price Search by entering the total price of the order.
Pending Select this option to expand your search to include pending estimates.
Historical Orders Click on this button to select a date range for your search.
Lost Includes estimates that have marked Lost.
Converted Includes estimates that have been converted into orders.
Voided Includes estimates that have been cancelled.
Reset/Save The options selected for your Search can be saved as the default or, they can be reset to the original default.
Right Click Options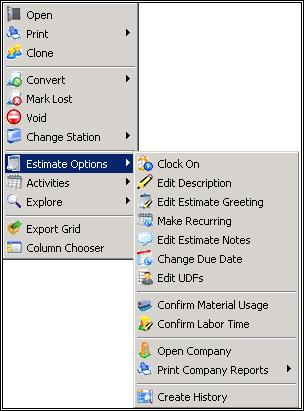
Open Open a record.
Print Prints the selected order, estimate, company, etc.
Clone Copies a pre-existing order, estimate, or product to a new record.
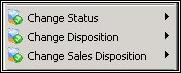
Convert Convert the estimate to an order or service ticket.
Mark Lost Mark the estimate as lost/not applicable.
Void Cancels a pre-existing order.
Change Station Changes the station of the estimate.
Change Division A division is a group of employees that you wish to keep separate for documentation purposes. A division is part of a company and can consist of both employees and sub groups.
Estimate Options Opens a list of options for your customization.
Activities Expands to create an email, note, call, appointment, meeting, to do, or work assignment.
Explore Expands to select the kind of Explorer window you want to open. It will open in a separate window.
Export Grid Creates a file that you can export to another program such as Microsoft Excel.
Column Chooser Opens a pop up box with a checklist of columns you can view in this box. Cyrious saves all your settings for each screen you customize.
View Company
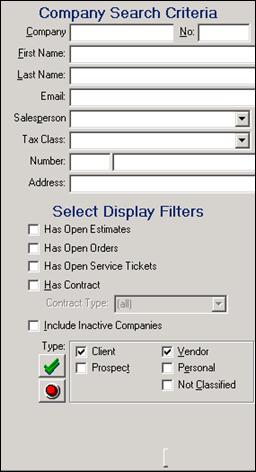
Company Enter a company name to search for; you can use a wildcard (*) if you don't know the exact company name.
No. Search by company number (automatically assigned by Control).
Names Searching for a name will search all names associated with a company, not just the primary contact.
Email Search by contact's email address.
Salesperson Search by salesperson assigned as primary to that company.
Tax Class Select the default tax class for this group. You can select from city, county and state tax classes.
Number Search by contact phone number.
Address Search by entering the company address.
Display Filters Use the filters to narrow your search. Select to include companies who have open estimates, orders, or service tickets, or who currently have a contract. You can also choose to include inactive companies.
Type Filter between current customers (Clients) and potential customers (Prospects), or filter on other company classifications, such as Vendor, Personal, or Not Classified.
Reset/Save The options selected for your Search can be saved as the default or, they can be reset to the original default.
Right Click Options
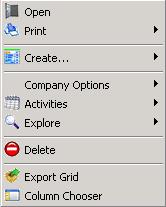
Open Open a record.
Print Prints the selected order, estimate, company, etc.
Create… Opens a sub menu of items you can create for the selected company, such as an estimate or an order.
Company Options Opens a list of options for your customization.
Activities Expands to create an email, note, call, appointment, meeting, to do, or work assignment.
Explore Expands to select the kind of Explorer window you want to open. It will open in a separate window.
Delete Option to delete the selected company.
Export Grid Creates a file that you can export to another program such as Microsoft Excel.
Column Chooser Opens a pop up box with a checklist of columns you can view in this box. Cyrious saves all your settings for each screen you customize.
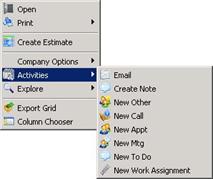
View Contact
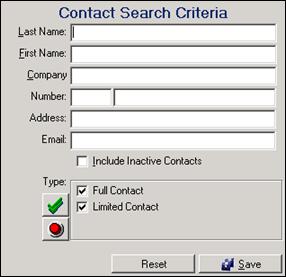
Names Searching for a name will search all names associated with a company, not just the primary contact.
Company Search for contacts in a company record.
Number Search by contact phone number.
Address Search by entering the company address.
Email Search by contact's email address.
Include Inactive Contacts Select this checkbox to include contacts that have been set inactive.
Type Filter on full or limited contacts.
Reset/Save The options selected for your Search can be saved as the default or, they can be reset to the original default.
Right Click Options
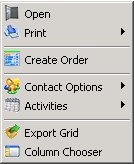
Open Open a record.
Print Prints the selected order, estimate, company, etc.
Create Order Creates a new order.
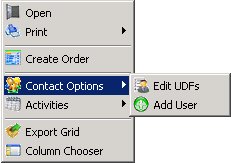
Contact Options Expands to provide the option to Edit UDFs or add another user.
Activities Expands to create an email, note, call, appointment, meeting, to do, or work assignment.
Export Grid Creates a file that you can export to another program such as Microsoft Excel.
Column Chooser Opens a pop up box with a checklist of columns you can view in this box. Cyrious saves all your settings for each screen you customize.
View Recurring Order
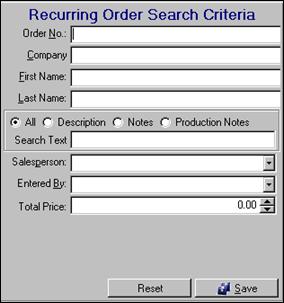
Order No. Search for a particular recurring order number (recurring orders are also known as templates).
Company Search for recurring orders in a company record.
Names Searching for a name will search all names associated with a company, not just the primary contact.
Search Text Search descriptions of all line items.
Choosing a Salesperson or Enterer Use the ellipsis box to the right of Salesperson and Entered By to reveal an organizational structure containing employees.
Total Price Search by entering the total price of the recurring order.
Reset/Save The options selected for your Search can be saved as the default or, they can be reset to the original default.
Right Click Options
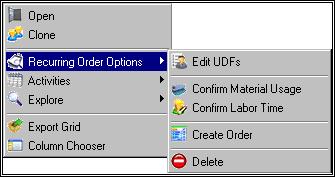
Open Open a record.
Clone Copies a pre-existing order, estimate, or product to a new record.
Recurring Order Options Opens a list of options for your customization.
Activities Expands to create an email, note, call, appointment, meeting, to do, or work assignment.
Explore Expands to select the kind of Explorer window you want to open. It will open in a separate window.
Export Grid Creates a file that you can export to another program such as Microsoft Excel.
Column Chooser Opens a pop up box with a checklist of columns you can view in this box. Cyrious saves all your settings for each screen you customize.
Creating Recurring Orders
With this feature, you can create a new “recurring order”. Open an existing order, and clone it but choose “Save as Recurring Order”. (If you don't have this option, you may have to enable it in System Setup.) This is just like an order, except it isn't real. You will see a tab on it called Recurrence. Choose the recurrence frequency and save.
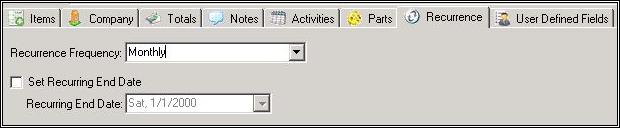
The recurrence frequency is just a user-defined list (in System Setup) doesn't automatically do anything. However, you can then tell Control to “Create Orders for xxxx”, where xxxx is a recurrence frequency. You can even add this command into your daily, weekly, or monthly, closeout routine (in Quick Reports).
This method is probably the simplest, and just requires you to set up a recurring order for each monthly or weekly order you want to run. However, each recurring order can be completely different from any other order.
Macro Order Creation
The second option is to create a single (or few) template orders and use the marketing macro creation to create orders for a list of customers using a recurring order as a template. In this case, for each type of recurring order you would (a) create a recurring order as a template but without a customer, (b) create a UDF for this group of customers who are billed repetitively, © run a macro to select those customers and generate orders from the template for each of them.
This method is easier if you have a lot of similar types of orders, but requires that they all have the same pricing or that the system be able to compute it based on the customer. You could, for example, have a group of “Monthly Electric Service Contract” customers and a product “Monthly Maintenance”. As long as this product could price correctly once the customer is set, then you can use a macro to create all the orders. (This typically means the product is pricing based on UDFs and pricing plans, or that the price is the same for all customers.)
View Line Item
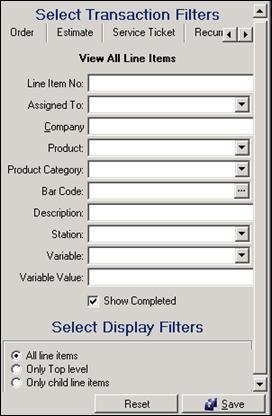
Order/Estimate/Service Ticket/Recurring Order/All Use the arrows along the top left hand of the screen to search orders, estimates, service tickets, templates, or all.
Assigned To Use the drop down box to search by the employee to which the line is assigned.
Company Search for line items in a company record.
Division A division is a group of employees that you wish to keep separate for documentation purposes. A division is part of a company and can consist of both employees and sub groups.
Product Use the drop down box to search by product.
Product Category Use the drop down box to search by product category.
Bar Code Input the item's bar code.
Description Search the description of the line item.
Station Use the drop down box to search for line items in a certain station.
Variable Use the drop down box to search by variable.
Variable Value Search by value of a variable.
Show Completed Use this box to expand your search to include completed line items.
Display Filters Select appropriate filters for your search.
Reset/Save The options selected for your Search can be saved as the default or, they can be reset to the original default.
Right Click Options
Open Open the selected line item.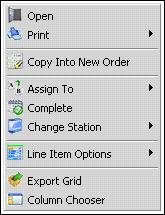
Print Print the selected order, estimate, company, etc.
Copy Into New Order Copies the line item into a new order.
Assign To Opens a list of employees to assign the selected line item to.
Complete Marks the selected line item as completed.
Change Station Opens a list of stations to change the selected line item to.
Line Item Options Opens a list of options for the line item.
Export Grid Creates a file that you can export to another program such as Microsoft Excel.
Column Chooser Opens a pop up box with a checklist of columns you can view in this box. Cyrious saves all your settings for each screen you customize.
View Activity
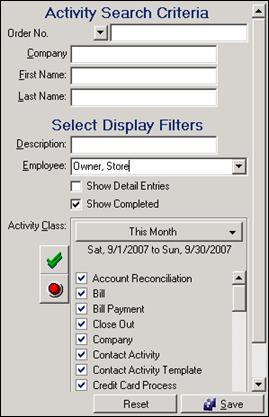 Order No. Enter a specific order number. Use the drop down arrow to reveal a list of other options, such as Estimate No.
Company Search for activities for a certain company.
Names Searching for a name will search all names associated with an activity, not just the primary contact.
Display Filters Select the filters you want to apply to the search, such as entering a description or choosing an employee. You can also select to show detail entries and show completed activities.
Activity Class Select the This Month button to reveal a list of classes. You may search temporally or choose to search activities by their close out classification.
Activity Check Boxes Select the activities you wish to view by clicking on their box, or view all by clicking the green check. To cancel selected activities, click the red circle.
Reset/Save The options selected for your Search can be saved as the default or, they can be reset to the original default.
Right Click Options
|| ||
||  |||
|||  ||
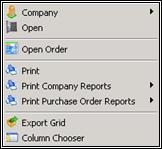
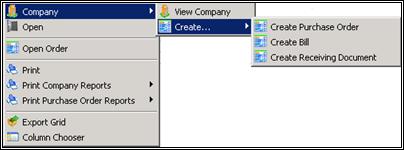
|| 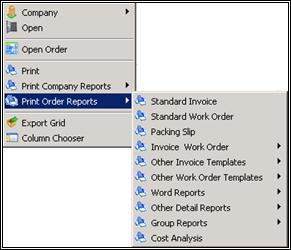 || * Company Opens a sub menu to either view the company record or create a new order, estimate, etc.
Open Opens Journal screen for that record to allow notes and account details to be entered.
Open Company Opens the Company screen for that item in a new window, if you have selected a company activity.
Open Order Opens the Order Screen for that item in a new window, if you have selected an order activity.
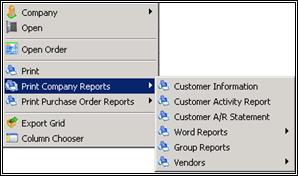
Print Company Reports Prints the selected order, estimate, company, etc.
Print Order Reports Prints the selected order, estimate, company, etc.
Export Grid Creates a file that you can export to another program such as Microsoft Excel.
Column Chooser Opens a pop up box with a checklist of columns you can view in this box. Cyrious saves all your settings for each screen you customize.
View Order in History
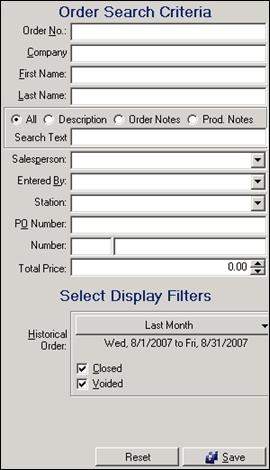
Order No. Enter a specific order number. If you do not know it, you can click on the magnifying glass to search for the Order in Explorer.
Company Enter a company name to search for; you can use a wildcard (*) if you don't know the exact company name.
Names Searching for a name will search all names associated with an order, not just the primary contact.
Search Text Search descriptions of all line items.
Choosing a Salesperson or Enterer Use the ellipsis box to the right of Salesperson and Entered By to reveal an organizational structure containing employees.
Station Select an order station to filter on.
P.O. Number Enter a specific Purchase Order Number.
Numbers Searching numbers will search all format of telephone contacts (office, cellular, etc.).
Divisions You must enable divisions before you can search for them.
Total Price Search by entering the total price of the Order.
Display Filters Use the filters to narrow your search. Click on Last Month to reveal a selection of filters from which to choose. You can also search closed and voided orders.
Reset/Save The options selected for your Search can be saved as the default or, they can be reset to the original default.
View Estimate in History
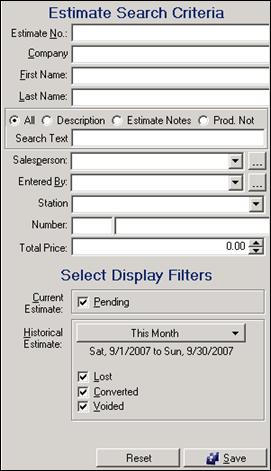
Estimate No. Enter a specific estimate number. If you do not know it, you can click on the magnifying glass to search for the estimate in Explorer.
Company Enter a company name to search for; you can use a wildcard (*) if you don't know the exact company name.
Names Searching for a name will search all names associated with an estimate, not just the primary contact.
Search Text Search descriptions of all line items.
Choosing a Salesperson or Enterer Use the ellipsis box to the right of Salesperson and Entered By to reveal an organizational structure containing employees.
Station Search according to the estimate station.
Number Search by company/contact phone number.
Total Price Search by entering the total price of the order.
Pending Select this option to expand your search to include pending estimates.
Historical Orders Click on this button to select a date range for your search.
Lost Includes estimates that have marked Lost.
Converted Includes estimates that have been converted into orders.
Voided Includes estimates that have been cancelled.
Reset/Save The options selected for your Search can be saved as the default or, they can be reset to the original default.
View Purchase Orders
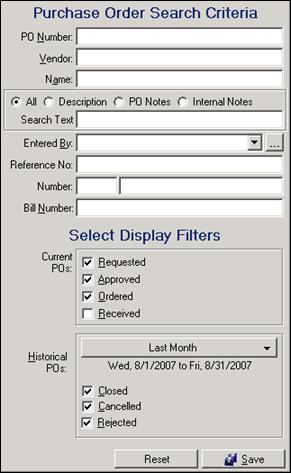
PO Number Enter a specific purchase order number.
Vendor Enter a vendor company name to search for; you can use a wildcard (*) if you don't know the exact company name.
Names Searching for a name will search all names associated with a vendor, not just the primary contact.
Search Text Search descriptions of all line items.
Entered By Use the ellipsis box to the right of Entered By to reveal an organizational structure containing employees.
Reference No. Search by a number entered in the reference number field on the purchase order screen.
Numbers Searching numbers will search all forms of telephone contacts (office, cellular, etc.).
Bill Number Search by bill number the purchase order was converted to.
Display Filters Use the filters to narrow your search based on PO status. Click on Last Month to reveal a selection of filters from which to choose. You can also search closed, cancelled, and rejected purchase orders.
Reset/Save The options selected for your Search can be saved as the default or, they can be reset to the original default.
Right Click Options
|| ||
||  ||
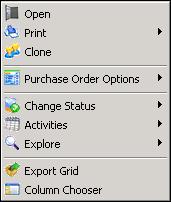
||- Open Opens the purchase order for viewing.
Print Opens a list of print options for the purchase order.
Clone Copies the purchase order into a new record.
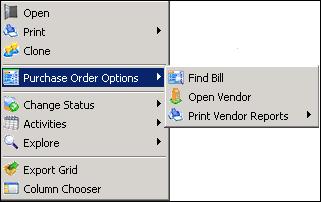
Purchase Order Options Opens a list of options for the purchase order.
Change Status Opens a list of options for changing the status of the purchase order.
Activities Expands to create an email, note, call, appointment, meeting, to do, or work assignment.
Explore Opens a list of options to explore the company or activities associated with the purchase order.
Export Grid Creates a file that you can export to another program such as Microsoft Excel.
Column Chooser Opens a pop up box with a checklist of columns you can view in this box. Cyrious saves all your settings for each screen you customize.
View Purchase Order Items
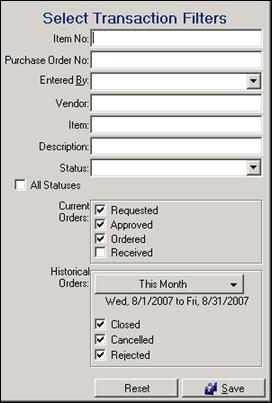
Item No. Enter the line item number of the purchase order.
Purchase Order No. Enter a specific purchase order number.
Entered By Use the ellipsis box to the right of Entered By to reveal an organizational structure containing employees.
Vendor Enter a vendor company name to search for; you can use a wildcard (*) if you don't know the exact company name.
Item Search by the item in the purchase order.
Description Search descriptions of all line items.
Status Search by status of the purchase order, or you can search on all statuses.
Current Orders Search on different purchase order statuses by selecting the checkboxes.
Historical Orders Click on This Month to reveal a selection of filters from which to choose. You can also search closed, cancelled, and rejected purchase orders.
Reset/Save The options selected for your Search can be saved as the default or, they can be reset to the original default.
Right Click Options
|| ||
|| 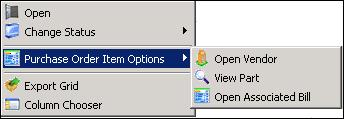 ||
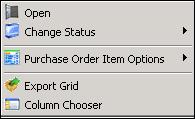
|| - Open Opens Journal screen for that record to allow notes and account details to be entered.
Change Status Opens a sub menu with available statuses to change the line item to.
Purchase Order Item Options Opens the Order Screen for that item in a new window, if you have selected an order activity.
Export Grid Creates a file that you can export to another program such as Microsoft Excel.
Column Chooser Opens a pop up box with a checklist of columns you can view in this box. Cyrious saves all your settings for each screen you customize.
View Bills and Vendor Credit Memos
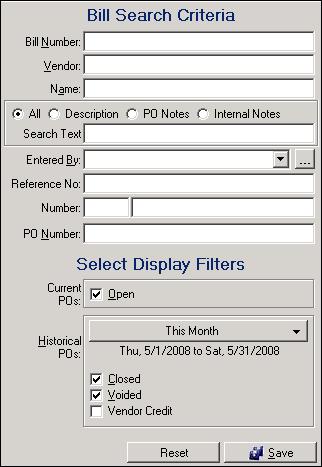
Bill Number Enter a specific bill number.
Vendor Enter a vendor company name to search for; you can use a wildcard (*) if you don't know the exact company name.
Names Searching for a name will search all names associated with a vendor, not just the primary contact.
Search Text Search descriptions of all line items.
Entered By Use the ellipsis box to the right of Entered By to reveal an organizational structure containing employees.
Reference No. Search by a number entered in the reference number field on the bill screen.
Number Searching numbers will search all forms of telephone contacts (office, cellular, etc.).
PO Number Search by purchase order number the bill was converted from.
Display Filters Search on bills that are currently open. Click on This Month to reveal a selection of date filters from which to choose. You can also search closed and voided bills and vendor credits.
Reset/Save The options selected for your Search can be saved as the default or, they can be reset to the original default.
Right Click Options for Bills
|| ||
||  ||
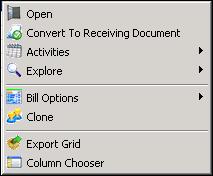
|| - Open Opens the selected bill.
Convert to Receiving Document Converts the selected bill to a receiving document.
Activities Expands to create an email, note, call, appointment, meeting, to do, or work assignment.
Explore Opens a list of options to explore the company or activities associated with the bill.
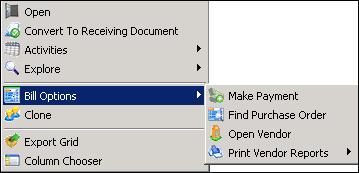
Bill Options Opens a list of options for the bill.
Clone Copies the existing bill into a new record.
Export Grid Creates a file that you can export to another program such as Microsoft Excel.
Column Chooser Opens a pop up box with a checklist of columns you can view in this box. Cyrious saves all your settings for each screen you customize.
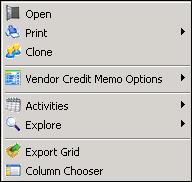
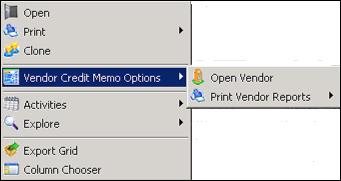
Right Click Options for Vendor Credit memo
|| ||
||  ||
|| - * Open Opens the selected vendor credit memo.
Print Prints the selected vendor credit memo GL detail or the vendor credit memo.
Clone Copies the existing vendor credit memo into a new record.
Vendor Credit Memo Options Opens a list of options for the vendor credit memo.
Activities Expands to create an email, note, call, appointment, meeting, to do, or work assignment.
Explore Opens a list of options to explore the company or activities associated with the vendor credit memo.
Export Grid Creates a file that you can export to another program such as Microsoft Excel.
Column Chooser Opens a pop up box with a checklist of columns you can view in this box. Cyrious saves all your settings for each screen you customize.
View Receiving Documents
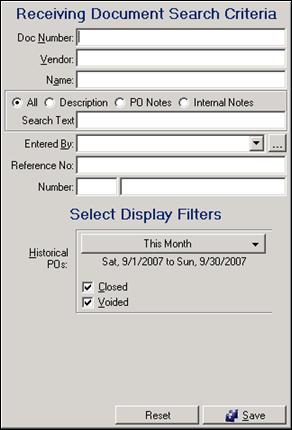
Doc Number Enter a specific receiving document number.
Vendor Enter a vendor company name to search for; you can use a wildcard (*) if you don't know the exact company name.
Names Searching for a name will search all names associated with a vendor, not just the primary contact.
Search Text Search descriptions of all line items.
Entered By Use the ellipsis box to the right of Entered By to reveal an organizational structure containing employees.
Reference No. Search by a number entered in the reference number field on the receiving document screen.
Numbers Searching numbers will search all forms of telephone contacts (office, cellular, etc.).
Display Filters Use the filters to narrow your search based on receiving document status. Click on This Month to reveal a selection of filters from which to choose. You can also search closed and voided receiving documents.
Reset/Save The options selected for your Search can be saved as the default or, they can be reset to the original default.
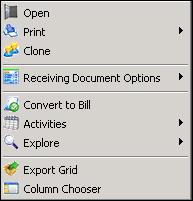
Right Click Options
|| ||
|| 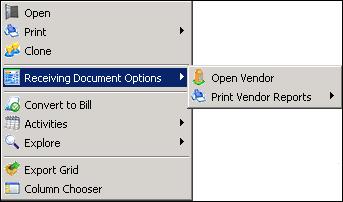 ||
|| - * Open Opens the selected receiving document.
Print Opens a list of options for printing the receiving document.
Clone Copies the existing bill into a new record.
Receiving Document Options Opens a list of options to open the vendor company record or print vendor reports.
Convert to Bill Converts the receiving document to a bill.
Activities Expands to create an email, note, call, appointment, meeting, to do, or work assignment.
Explore Opens a list of options to explore the company or activities associated with the bill.
Export Grid Creates a file that you can export to another program such as Microsoft Excel.
Column Chooser Opens a pop up box with a checklist of columns you can view in this box. Cyrious saves all your settings for each screen you customize.
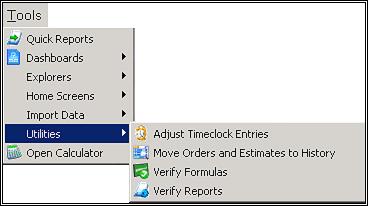
Move Orders and Estimates to History
|| ||
|| 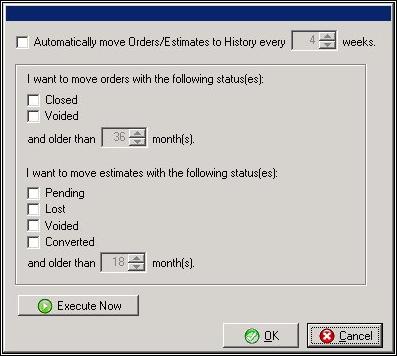 || * Automatically Move Orders/Estimates to History every few weeks.
* Default is set to four but not checked.
Order Status Closed, Voided and older Orders
* Default is set to 36 months but not checked.
Estimate Status Pending, Lost, Voided, Converted and Older Estimates
* Default is set to 18 months but no options are checked.
Execute Now Click this button to begin archiving orders and estimates.
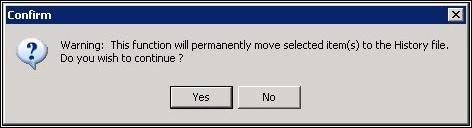
Right Click Options
Export Grid Creates a file that you can export to another program such as Microsoft Excel.
Column Chooser Opens a pop up box with a checklist of columns you can view in this box. Cyrious saves all your settings for each screen you customize.
Journal
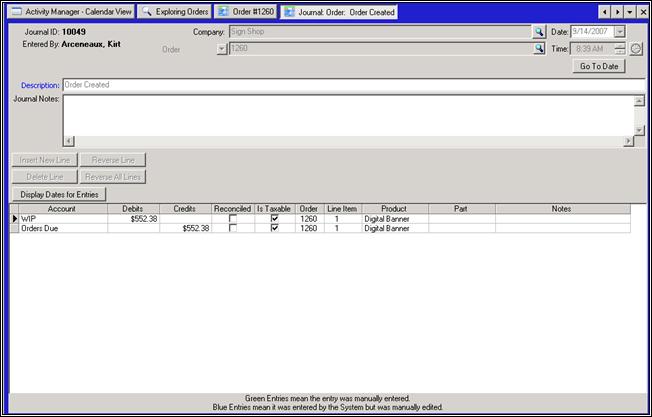
To view the Journal screen for a journal entry, open the order (or bill, or service ticket, etc.) you want to view and go to the Activities Tab. Find the item you want to view and double click it; the journal entry will appear in a new screen. This screen will show you accounts that have been credited or debited for a transaction, and the amounts. You can also see if the transaction has been reconciled yet, if it is taxable, and what the product and parts are in the item selected. This screen can be edited, however, be careful that any amounts you might edit match up with the total transaction.
Advanced Criteria Screen
The Advanced Criteria screen can help to narrow down a search. Open an explorer with the information you are searching for, and click Advanced at the top of the screen. When the screen below appears, you can click on Modify Criteria to further narrow your search, or to remove any of the existing criteria. When you have the desired criteria chosen, click Execute to execute the query. If this is a query you will use again, you can select Save and save it with a descriptive name for future reference.
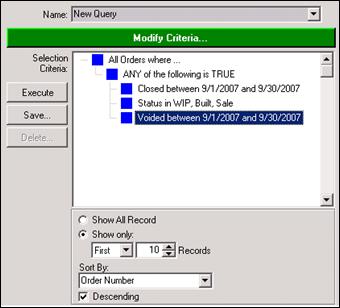
Name Use the drop-down box to select previous queries.
Modify Criteria Modify your search.
Selection Criteria Specify what criteria to use for your search.
Execute After creating a query, select execute to activate that search.
Save Saves all entered information. It will be available for selection from the Name drop-down box.
Show All Records You have the option to view all results from a query or further sort them into a number of desired orders. Select Show All Records to view all results.
Show Only Select this box to sort the results even further. Choose your criteria from the Sort By drop-down box.
Sort By Use the drop-down box to select a criterion to sort your results.
Modify Criteria Sub Screen
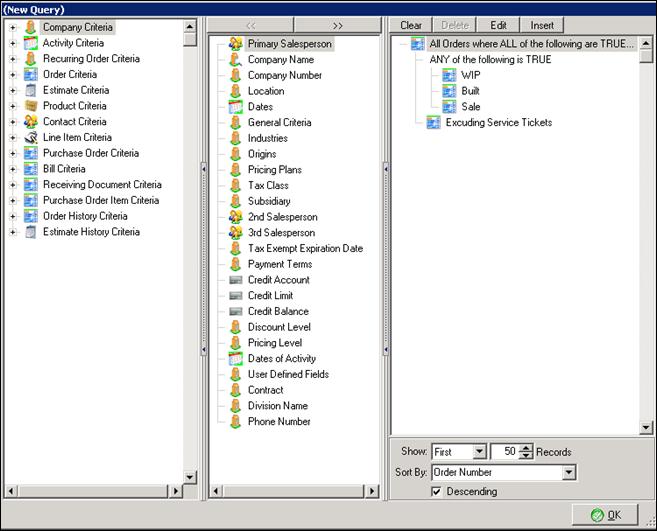
Click the green Modify Criteria button on the upper left-hand side of the screen. The New Query screen will appear. Use the hierarchical structure on the left side of that screen to select the criteria you would like to use. At the bottom portion of this screen are further options to limit your search to a manageable number, as well as an option to sort your results by alternate criteria. Use the drop-down box to select a sorting option.
Sub Explorer View
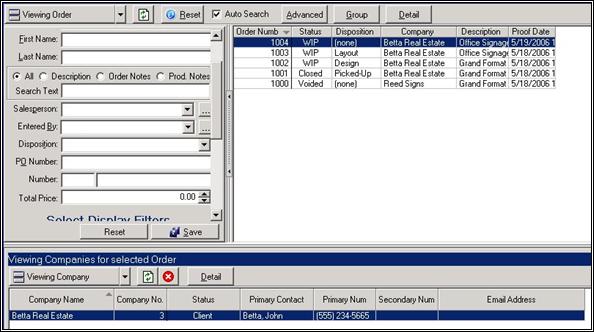
Use the Sub-Explorer views at the bottom of the window to view a set of records associated with the search results Explorer has displayed in the main search grid.

For example, if you are viewing an order and wish to view the company associated with it, choose to view the company sub screen. Here, the company's information appears at the same time as the order. All Right Click options work the same in the Sub Explorer.
A Tip for Using Sub Explorer View
Most of us here at Cyrious use the Sub Explorer almost 100% of the time we are using the software. We like to see which company an order corresponds to, or who is calling about a service ticket.
Because having to toggle on the Sub Explorer view every time you logged in to Control would be tiresome, we added a button near the top tool bar that we hope would help you as much as it helps us.
Say you have selected View Companies in your main Explorer screen. In your Sub Explorer view, you have selected View Orders. Click the Save Layout button in the top right corner of the Explorer window to save this view.
Now, every time you view companies in your main Explorer window, the orders Sub Explorer view will automatically pop up.
|| || You can save a layout type for every main Explorer view. ||
Effective Use**
You will need to use Explorer any time you need to view a record from in your system. Even if you know every detail about, say, an order, you will still need to use Explorer to type in at least the order number to pull up the record for that. Explorer is also useful when you do not have all complete details about something. For example, if a customer sends in a check, but does not specify an order number on the check memo, you can View Companies in the main Explorer window, find that company by typing in the address, then pull all their open orders in the Sub Explorer view to locate the order for which they have sent in the check. Getting to know Explorer is a skill that the majority of our Users pick up quickly. Once you have given it a little bit of time, navigating the system is no more difficult than scooping ice cream or riding a bicycle.