The order, estimate, and service ticket screens largely resemble one another. To create an estimate, order, or service ticket, you must enter information describing the company and items included.
Control also allows you to save notes, check totals, include additional company information, and schedule/monitor jobs for each item or part involved in the ordering process. You can even create a set of User-Defined Fields to classify information about your orders.
An order template is a shell of a commonly ordered product for a company. This reduces time spent creating duplicate orders. You can also clone orders to cut down administrative hours.
Screens
We will take you through the process of completing an order from start to finish. Most customers will probably ask you for an estimate before they give permission to proceed on a job, so we will show you how to create an estimate, convert it to an order, and mark it for completion. There are a few different ways to create a new estimate; from the Navigator instrument on the Home dashboard, through the main menu, or through the main toolbar.
Special Actions Toolbar Functions
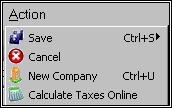
- Save – Saves all entered information. Expands so you can select whether you want to save the open record as an order, estimate, or service ticket.
- Cancel – Disregards changes and additions made to a record.
- New Company – Opens a screen to create a new company.
- Calculate Taxes Online – If you subscribe to Avalara Online tax lookup, selecting this option will check the taxes on an estimate.
Special Action Menu Functions
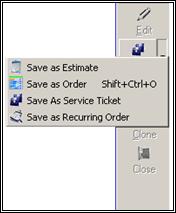
When you have just opened the New Estimate screen, these options are available throughout the new estimate creation process i.e. all tabs mentioned below.
Company Tab
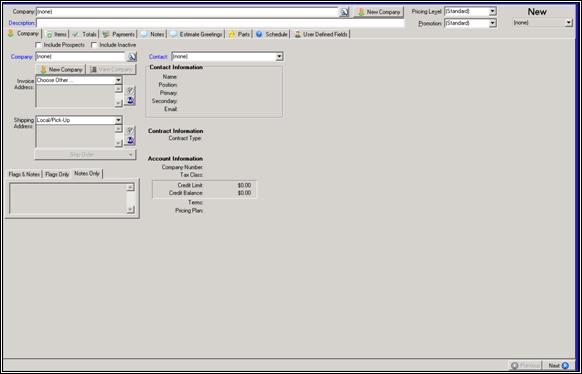
The Company tab is the start of every estimate. Three fields on this screen are mandatory.
- Description – Type in a master description for the order.
- Company – You must designate a company.
To pull up an existing company name, either type in the first three letters of the company name and press Enter, or open Explorer by selecting the button to the right of the company field. When searching for companies, you can check the boxes above the entry field to include prospects or inactive buyers to broaden your search results.
You can also create a new company by clicking the New Company button below the entry field. After creating a new company entry, it will auto-populate in the New Estimate screen.
Once you select or create a company, their invoicing and shipping addresses will auto-populate in the boxes below.
- Contact – This option is available after you have entered a company name. You have the option of using the selection list to search for it. Once you select a contact, their information will auto-populate in the Contact Information box below.
- Ship Order – Click this button to choose whether you want to ship this order to the invoicing or shipping address. Alternately, you can enter in a completely different shipping address.
- View Company – Click this button to open up the company record in a separate Explorer window. You can make any needed changes in that window, and after saving the updated record, the changes will show up in the New Estimate window.
- Contract Information – The type of contract you have with this company, if any, will appear here.
- Flags/Notes – Other specific information about the company.
- Account Information – The company's financial summary will show here.
Items Tab
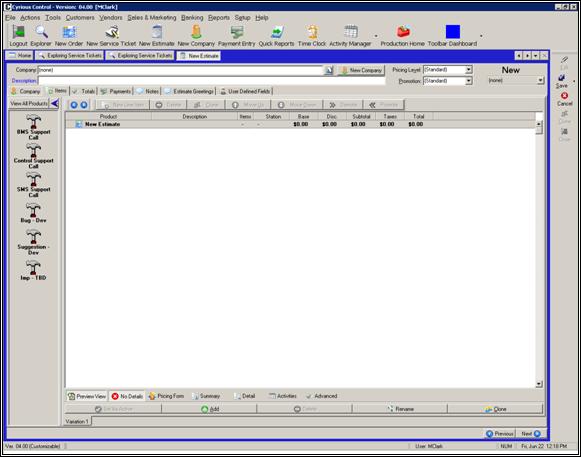
Use this screen to enter the items for your estimate. Your Quick Products list will initially appear in the box at the left, but you can choose to view all items by clicking the “View All Products” button.
To add items to an estimate, do the following:
- Locate the product you want to add to the estimate in the product tree displayed in the box to the left
- Double-click the item you want to add to the estimate
- Depending on how you have set up your product, you may get a pop-up screen asking you to enter in additional details about the product (size, color, discount)
- Keep adding items to the estimate until you are done.
There are additional functions available in the main Items tab screen.
- Copy New Line Item – Copies a line item from a selected order.
- Copy All Line Items – Copies all line items from a selected order.
- Blue Arrow – Pressing the big blue arrow will toggle between viewing your Quick Products and viewing a product tree.
- View Quick Products – Designate the Quick Products you want members of this group to see when they initially log in to Control.
- New Line Item – Creates a new line item.
- Delete – Removes a line item from the estimate.
- Clone – Copies a pre-existing order, estimate, or product to a new record.
- Move Up – Moves the selected line item up.
- Move Down – Moves the selected line item down.
- Demote – Moves the selected line item down one level.
- Promote – Moves the selected line item up one level.
Right Click Options
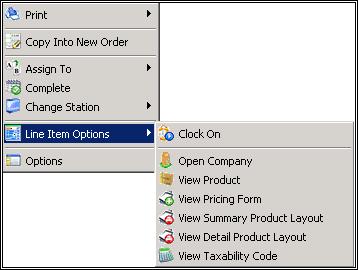
- Print – Prints the selected order, estimate, company, etc.
- Copy Into New Order – Opens a screen to create a new order.
- Assign To – Expands to show a list of employee names. Select the employee you want assigned to this item.
- Complete – Marks the selected line item as completed.
- Line Item Options – Expands to show a list of functions you can perform that are pertinent to the item. Clock an employee onto that job; view the company, product, pricing, and product layout.
- Options – Opens a list of options for your customization.
View Toolbar

The tool bar directly below the line item entry field contains some additional options for viewing information about products.
- Preview View – Shows a short summary description of the products on the Line Item Entry screen.
- No Details – Collapses the summary descriptions, leaving a short list of products.
- Pricing Form – Reveals the pricing form for a highlighted item. You can make changes on this form for the items selected.
- Summary – Reveals the product layout for invoices/orders.
- Detail – Reveals the product layout for work orders.
- Activities – Expands to create an email, note, call, appointment, meeting, to do, or work assignment.
- Parts – Reveals the parts included in the highlighted item. You can make changes to the parts listed in this section. Double click on the portion you wish to change and enter the new information.
- Summary Schedule – View and schedule jobs for an individual item.
- Advanced – Assign the sale account for an item. You can override the default account by selecting a new sale account for an item. From this screen, you can also assign an employee and stage to the item. You can also change the default address to a new shipping address for each item on the order. This will also change the tax on that item.
Using the Variation Toolbar

The Variation toolbar, directly below the View toolbar, is the only notable difference between the order and entry screens. The Variation toolbar allows you to create alternate estimates for a potential order without forecasting multiple estimates. All variations will print on the same estimate. The first variation listed is the one that will be included on your expected revenues.
- Set as Active – Designate the order the buyer is most likely to approve.
- Add – Create a new tab and alternate estimate. You must name your variation before you can begin entering items.
- Delete – Removes a variation.
- Rename – Renames a variation.
- Clone – Copies a pre-existing variation. This is ideal if you only want to tweak one or two things.
Totals Tab
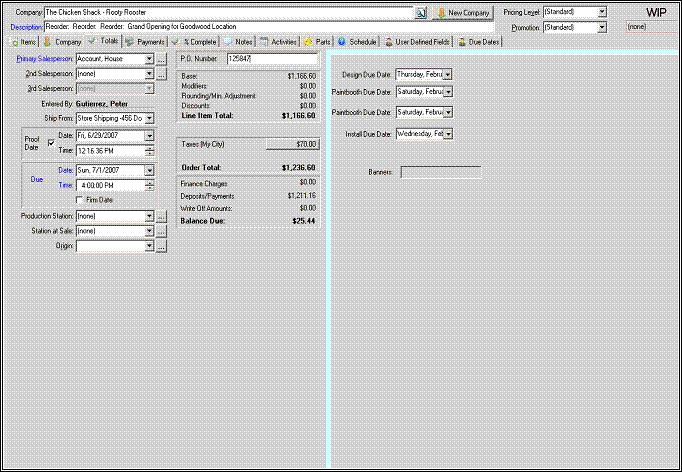
- Primary Salesperson – Check this box to assign salesperson status.
- Second Salesperson – Check this box to assign salesperson status.
- Third Salesperson – Check this box to assign salesperson status.
- Entered By – Displays the name of the employee who entered the record.
This field cannot be changed.
- Proof Date:
- Date – Enter the date that the proof was received.
- Time – Enter the time the proof was received.
- Due:
- Date - Enter the due date for the product.
- Time - Enter the time the product is due.
- Firm Date – Check this box to designate a due date as final; the customer will not accept the product after this date.
- Production Station – The station the product is in.
- Station at Sale – The kind of order this will be when it is sold.
- Origin – The origin of the order.
- P.O. Number – Purchase Order number.
- Pricing breakdown – This tab will display the breakdown of every charge for this order. You cannot change anything from this area of the screen if the amount in dollars is not displayed on a button. In the screen capture above, you could click on the $0.00 button on the City Taxes line. Use the Items tab to alter any other prices.
Totals Tab UDF's
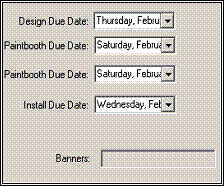
The purpose of the UDF's are to allow the user to specify numerous due dates on the totals tab of an order. The user is able to set due dates and view them by clicking on the totals tab of an order. The user can also specify (as a store option) which UDF template to display and where on the screen to display it.
- Design Due Date - This box lists the date that the design is due.
- Paint booth Due Date - This box lists the date that the product is due at the paint booth.
- Install Due Date - This box lists the date that the install is due.
Notes Tab
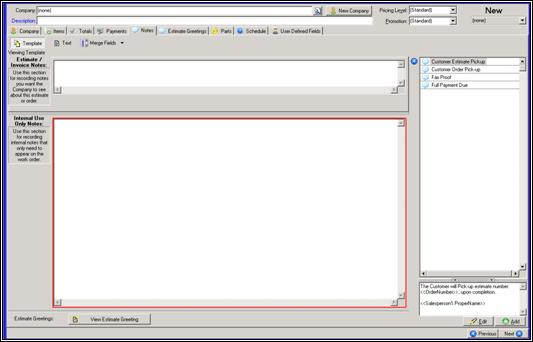
- Template Mode – Mode where using templates is easily accessible, as pictured in the above screen capture.
- Text Mode – Mode where entering text is enabled.
- Merge Fields – Used to create Speed Notes.
- Estimate/Invoice Notes – Other specific information about the Estimate. These notes appear at the bottom of the Estimate in the Notes section; the customer will see these notes.
- Internal Use Only Notes – Other specific information about the Estimate. These notes are visible only to employees; the customer does not see any information in this section.
- Speed Notes – These are note templates that can be added to the notes section.
- View Estimate Greeting – Opens a pop up window that shows what text will appear at the top of the invoice. You can use Speed Notes for this, too.
Estimate Greetings Tab
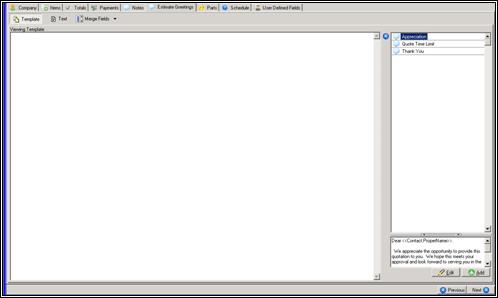
Use this section to designate the greeting that will show up on the estimate. You may either enter in your greeting manually or select a message from the Speed Notes list to the right of the box.
This tab functions exactly like the Notes tab, except the information that shows here will only print out on the estimate, and not on the order itself.
Parts Tab
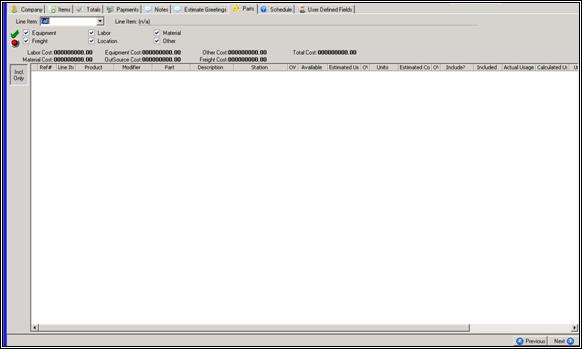
Use this screen to view all of the parts used in all of the line items in the estimate. This helps if you want to review costs incurred from the variables entered when assigning parts. You can filter the parts for viewing by using the check boxes with the parts' description labels.
Show 0 Qty Parts Check to include parts with zero quantities.
Show Only Included Parts Check to show only parts that are included on the order. Uncheck to show all parts linked to the products and/or modifiers, whether they are included on this estimate or not.
Show Display Units instead of Inventory Units
- Check to show the usage quantities in the display units of the part.
Note: This option is available in version 04.50.1108.1901 and later. You can adjust the actual costs of the individual parts by typing over the costs that appear in the Cost columns. Doing so automatically checks the OV (override) button. Leave estimated costs as they are.
- Ref# – An automatically generated number used to keep track of your parts.
- Line Item – The line item number to which this part corresponds.
- Product – The product to which this part corresponds.
- Modifier – Any modifiers to which this part corresponds.
- Part – Enter the part name to which you want to bill time. If you do not know exactly how the record is entered in Control, you have the option of using the selection list to search for it.
- Description – A description of the part.
- Station – The station that the line item is currently set at.
- Available – Denotes whether or not that part is available/in stock.
- Estimated Usage – How much of the part is going to be used to fill this order. This column is not applicable for parts being replenished (produced for inventory).
- OV check box – Check if any value needs to be overridden. This column is not applicable for parts being replenished (produced for inventory).
- Units – The units used for this part.
- Estimated Cost – Amount it will cost to use the estimated amount of the part. This column is not applicable for parts being replenished (produced for inventory).
- OV check box – Check if any value needs to be overridden. This column is not applicable for parts being replenished (produced for inventory).
- Include? – Select whether to automatically, always, or never include the part; default is Auto.
- Included – Check if the part was used.
- Actual Usage – Calculated after the order is complete. Shows how much of the part was actually used to complete the order.
- Unit Cost – Calculated after the order is complete.
- Calculated Usage – Check if any value needs to be overridden.
- Actual Cost – Calculated after the order is complete. Shows what the actual cost was.
- Actual Price – Calculated after the order is complete. Shows how much the amount used cost.
Note: The following columns are only available when a PFI part is attached to the order (is being replenished) and with versions 04.50.1103.2201 and later. For more information on PFI parts, click on this link fulfillment_overview.
- Qty Replenish - How much of the part is going to be produced for this order. This value cannot be changed after the order is built.
- OV - Qty Replenish - Check if the Qty Replenish value needs to be overridden. This value cannot be changed after the order is built.
- Replenish GL Account - Displays the GL account that will used when the inventory for the part is replenished. This value cannot be changed.
- Replenish Cost - Calculated after the order is built. Shows the cost of the increased inventory. This value cannot be changed after the order is built.
Schedule Tab
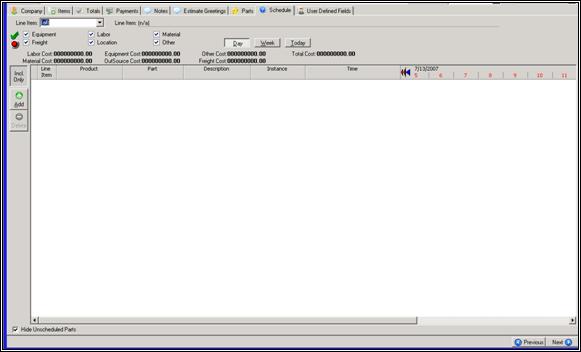
Each part may have a calendar, though that is not necessary. If you select labor in a calendar, you may assign an employee to that job.
- Line Item – The line item number to which this activity corresponds.
- Product – The product name.
- Part – The part name.
- Description – Description of the part.
- Instance – Denotes the frequency of the activity displayed.
- Time – Scheduled time for the activity.
- Timeline – If you have selected a day view, this area will display hours. If you have selected a week view, this area will display days. Assigning a Calendar to a Part
- Select a part instance from the drop down list
- Designate a block of time to schedule that activity
- Double click in the time slot to reveal a New Activity screen
- Use the Calendar tab to schedule both equipment and labor, and view if equipment and labor are scheduled at the same time. * Control does not prevent you from overlapping scheduled employees or parts.
User-Defined Fields Tab
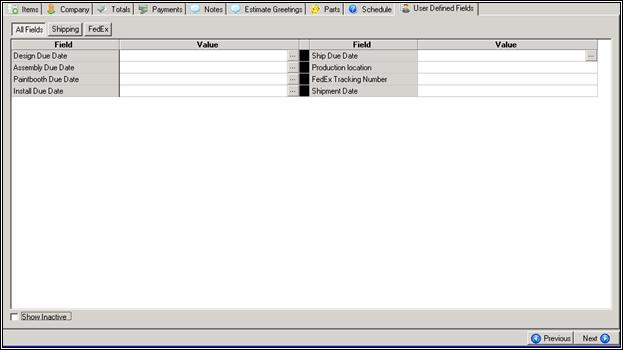
This screen displays any User-Defined Fields you have set up. Adjusting Estimates, Orders, and Parts
You can search for an order, estimate, or company by using the Explorer button.
- Locate the estimate you wish to adjust.
- Click Edit. * # Make your adjustments. *
- Select Save to apply changes.
Pre-Existing Orders Special Actions Toolbar Functions
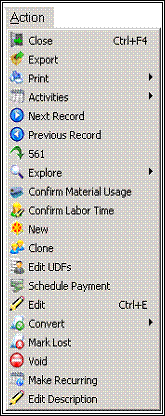
- Close – Close the order window you currently have open.
- Export - Will export the order to a different location.
- Print – Will expand to show options for the things you can print from this window. These options will be for invoices, shipping records, and so forth.
- Activities – Expands the normal Activities menu found throughout Control.
- Next Record – In this example, we are viewing Order No. 561. Selecting this option would take us to Order No. 562.
- Previous Record – In this example, we are viewing Order No. 561. Selecting this option would take us to Order No. 560.
- [Order No.] – This option refreshes the order window.
- Explore – Expands the Explore menu. You can select a type of Explorer view, and it will open up in a new Explorer window.
- Confirm Material Usage – This option opens up the Confirm Material Usage dialogue. See Chapter 13, Confirm Material Usage.
- Confirm Labor Time – This option opens up the confirm Labor Time dialogue. See Chapter 13, Confirm Labor Time.
- New – Opens a new order window.
- Clone – Clones the order you currently have open.
- Edit UDFs – Opens a window allowing you to edit the order's User-Defined Fields.
- Schedule Payment - Opens a window allowing you to schedule a payment due date.
- Edit – Enables you to edit the order.
- Convert - Expands to show the conversion options available to convert the order.
- Mark Lost - Allows you to mark the order as lost.
- Void – Voids the order.
- Make Recurring - Allows you to make the order a recurring order.
- Edit Description – Enables you to edit the description of the order.
Effective Use Using Estimates and Orders
- Many of our companies will likely use a procedure that goes something like this:
- The salesperson creates an estimate, and provides the customer a quote from this estimate
- After the customer agrees to the quote, the customer signs off on it
- Once the estimate is approved by the customer, it is converted to an order
- No line items are sent to production until a supervisor has approved the order and payment has been processed
- Integrating estimates into the workflow will help your company catch mistakes. Additionally, it is so easy to convert an estimate into an order; there really is no need to skip this step – a step that many customers favor.
Converting an Estimate to an Order
||  ||
||  ||
||
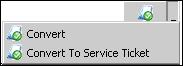
Figure 11 15 Estimate Action Toolbar Convert Button Highlighted
Figure 11 16 Estimate Action Toolbar Convert Button Options
- Click the arrow on the Convert button on the right hand action menu
- Select whether you want to convert the estimate to an order (Convert) or a service ticket (Convert To Service Ticket)
- In the window that pops up, confirm that you want to convert the estimate
- Check the box if you want to edit the order after converting it
Cyrious will keep track of estimates, even after you have converted them. Also, after you convert an estimate into an order or a service ticket, the Internal Notes section in the order/service ticket will say something like “Converted from Estimate #308619”. * Activities Sub Menu*
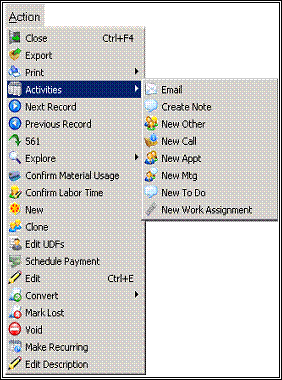
The Activities menu expands to create an email, note, call, appointment, meeting, to do, or work assignment. Using Service Tickets 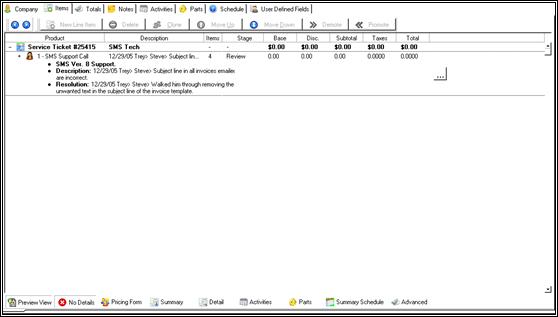
Service tickets are records of services you provide to companies. Instead of adding products in the Items tab, you would add services, such as “Affix decal sign to company's automobile”. To save an order as a service ticket, select the arrow on the Save button on the right-hand side of an estimate or order screen. Select Save as Service Ticket. You can view service tickets by selecting an Explorer search.
Status
The status option is available when you are using an order or a service ticket. The Status sub menu is located in the right hand Activities menu.
As with all other sub menus, clicking the arrow will display a vast array of options. In this particular case, there are even more options available …
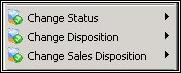
… Moreover, the options are customizable. Here at Cyrious Software, we have created different statuses to use for orders and service tickets. Our Implementation Team can teach you how to make use of this feature to fit your company's needs.